Introduction
GrAPiC is a small, easy-to-use framework to add graphical functionalities to your C/C++ code. Its main goal is to provide easy graphical functions to be used in introduction courses of algorithm and programming in C/C++. It is based on SDL2 but to use it you need to know only few very simples functions. The Grapic archive comes with the needed SDL part, you do not have to install SDL. Just unzip and enjoy !
Download
Download and install the last version from here: https://github.com/ucacaxm/grapic/releases
Or you can clone the beta version from the GitHub repo : https://github.com/ucacaxm/grapic
How to start ?
Run on Windows with Codeblocks (the default)
- Install Codeblocks 20.03 (IMPORTANT) from: http://www.codeblocks.org/downloads
Take the one with MinGW like codeblocks-20.03mingw-setup.exe
- Download the archive file, see section download.
- Run with CodeBlocks
- Open the file Grapic/build/windows/grapic_workspace with Codeblocks
- Select in the projects manager (on the left) the project you want with the right button "Activate project":
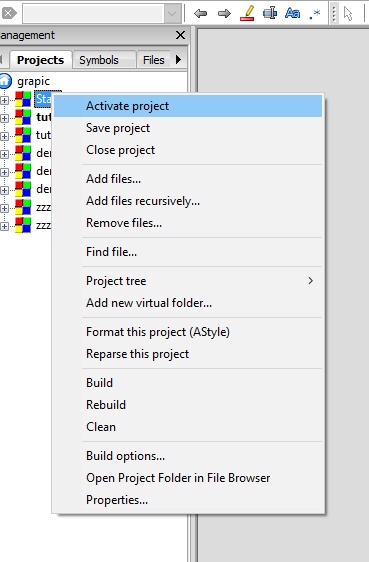
Selection of the project in Codeblocks
- And run the program ! \ \
Run on Windows with Visual Code/VSCode (mostly for advanced users).
- VSCode is not Visual Studio
- Install MinGW as described here:
- Using GCC with MinGW for Visual Studio Code on Windows
- Add the path to your Mingw-w64 bin folder to the Windows PATH environment variable by using the following steps:
In the Windows search bar, type 'settings' to open your Windows Settings.
- Search for Edit environment variables for your account.
- Choose the Path variable and then select Edit.
- Select New and add the Mingw-w64 destination folder path to the system path. The exact path depends on which version of Mingw-w64 you have installed and where you installed it. If you used the settings above to install Mingw-w64, then add this to the path:
C:\msys64\mingw64\bin.
- Select OK to save the updated PATH. You will need to reopen any console windows for the new PATH location to be available
- Install C++ extension for VSCode\
- Compile and Run: first option with the file tasks.json
- Open Visual Studio Code, then menu File+Open Folder and select grapic.code-workspace in the the grapic folder.
- Compile/Build: Ctrl+Shift+B. It calls the makefile and compile the default file which is apps/start/main_start.cpp.
- Run/Test: Ctrl+Shift+P and enter
run test. It runs the default executable: bin\start.exe. You can add a shortcut.
- Edit the file
.vscode/tasks.jsonto change the project
- Compile and Run: second option with the terminal
- Open a terminal (Ctrl+Ăą or menu Terminal/new terminal)
- Test if the installation of MinGW and the path setting are OK: run
g++ and mingw32-make just to see if ok
- Change directory (and stay always in this directory):
cd build\\windows-cb20
- To compile:
mingw32-make -f Start.make
- To run:
..\\..\\bin\\Start.exe
- Compile and Run: third option with CMake
- install cmake support for Visual Code and open script/cmake/CMakeLists.txt
Run on Linux
- Install SDL2, SDL_Image for SDL2 and SDL_ttf for SDL2 ; for instance with
sudo sudo apt install g++ premake4 zip doxygen libsdl2-dev libsdl2-mixer-dev libsdl2-
image-dev libsdl2-ttf-dev
Image image(const char *filename, bool transparency=false, unsigned char r=255, unsigned char g=255, unsigned b=255, unsigned char a=255)
Return an image loaded from the file filename.
Definition: Grapic.h:587
- Download the archive file, see section download.
- Run with CodeBlocks
- Open the file Grapic/build/linux/grapic.workspace with Codeblocks.
- Select in the projects manager (on the left) the project you want with the right button "Activate project":
Selection of the project in Codeblocks
- And run the program !
- Compile all and run in the Terminal:
- cd ....grapic
- make
- bin/demo
- Compile one program and run in the Terminal:
- cd ....grapic
- make projectName (replace projectName by the name of your project: 'make list' provides the list of all projects)
- bin/projectName
Run on MacOS
- Update MacOS to the last version
- Update XCode
- Open App Store
- Look in the top right for the updates section
- Find Xcode & click Update
- If you have a Mac M1 (ARM processor ARM, not an INTEL), you need Rosetta 2
- Install grapic https://licence-infi.univ-lyon1.fr/grapic
- Download the zip file for MacOS (grapic-vVV.VV.VV-MacOS.zip)
- Unzip it
- With XCode
- Run a terminal this command to launch XCode, or launch XCode from the menu
- Open a project in this path: grapic-vVV.VV.VV-macosx/build/macosx/Start.xcodeproj
- Compile and run
- Run in a terminal (bash)
- Enter these commands to compile:
cd .../
grapic-vVV.VV.VV-MacOS # trouver le chemin vers l
'endroit où vous avez décompressé le .zipmake
- To run:
bin/Start
- It should open the grapic app with squares
Run on C5 (web without any installation, onle from c5.univ-lyon1.fr)
Run on Replit (web without any installation)
- You can try Grapic on the web with Replit: https://repl.it/@ucax217/grapic-light#main.cpp
- Create an account on repli.it
- Fork the project to be abble to change it
- All the code is in the file main.cpp
- "run": compilation errors are in the terminal on the right. Execution is on the top right.
Edit my first program
The kernel source code of grapic is in grapic/src. The source codes of the programs/demos/tutorials are in grapic/apps. You can edit your first program by editing the file grapic/apps/start/main_start.cpp
Create a new project
You can create your own project.
- Copy the directory apps/start into apps/MYPROJECT (replace MYPROJECT by the name you want)
- Rename apps/MYPROJECT/main_start.cpp into main_MYPROJECT.cpp
- Edit the file Grapic/premake4.lua and add at the end make_project( "MYPROJECT", "apps/MYPROJECT/main_MYPROJECT.cpp" )
- Run the script 'premake.bat' on windows; or 'make premake' on Linux/MacOS
If you are following the course LIFAMI, run lifami.bat on windows or enter "make lifami" on Linux in the command line, it will create for you all the projects for the tutorials.
Tutorials
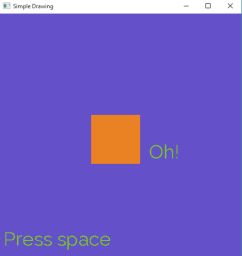
Tutorial 1: Simple program

The code of the tutorial 1
simpleDrawing" illustrates the basis of Grapic" width=200px
#include <cmath>
int main(int , char** )
{
winInit(
"Simple Drawing", 500, 500);
bool stop = false;
bool oh = true;
int i = 0;
while(!stop)
{
i += std::min(frameTime, 100.0f);
if(oh)
{
print(500-i*0.2, i*0.2,
"Oh!");
if(i > 1000)
{
i = 0;
oh = false;
}
} else
{
print(i*0.2, i*0.2,
"Ah!");
if(i > 1000)
{
break;
}
}
}
return 0;
}
void backgroundColor(unsigned char _r=255, unsigned char _g=255, unsigned char _b=255, unsigned char _a=255)
Change the default background color (the color used to clear the screen)
Definition: Grapic.h:355
void color(unsigned char _r=255, unsigned char _g=255, unsigned char _b=255, unsigned char _a=255)
Change the default color (unsigned char values between 0 and 255)
Definition: Grapic.h:341
unsigned int lastFrameTime()
Returns the time elapsed between the last frame in milliseconds. It can be used to sync animations wi...
Definition: Grapic.h:334
void print(int x, int y, const char *txt)
Print the text txt , up left corner is (x,y)
bool winDisplay()
Display the window. All drawing is hidden until this function is not called.
Definition: Grapic.h:300
void rectangleFill(int xmin, int ymin, int xmax, int ymax)
Draw a filled rectangle from (xmin,ymin) to (xmax,ymax)
void winClear()
Clear the window with the default background color.
Definition: Grapic.h:262
void winQuit()
Quit and close all things.
Definition: Grapic.h:307
void pressSpace(bool isPrint=true)
Stop the program until key 'space'is pressed.
void fontSize(int s)
Change the default size of the font.
Definition: Grapic.h:519
void winInit(const char *name, int w, int h, int posx=-1, int posy=-1)
Initialize the window with a size w,h and a position (posx,posy). If posx<0 or posy<0,...
Definition: Grapic.h:245
Tutorial 2: First Loop
The code of the tutorial 2 shows how to write the main loop of a Grapic application
const int DIMW = 500;
struct Data
{
int n;
};
void init(Data& d)
{
d.n = 10;
}
void draw(Data& d)
{
int i;
for(i=0;i<d.n;i++)
{
color(20*i, 255-20*i, 128);
rectangle( DIMW/2 - 10*i, DIMW/2 - 10*i, DIMW/2 + 10*i, DIMW/2 + 10*i);
}
}
int main(int , char** )
{
Data dat;
bool stop=false;
init(dat);
while( !stop )
{
draw(dat);
}
return 0;
}
void rectangle(int xmin, int ymin, int xmax, int ymax)
Draw a rectangle from (xmin,ymin) to (xmax,ymax)
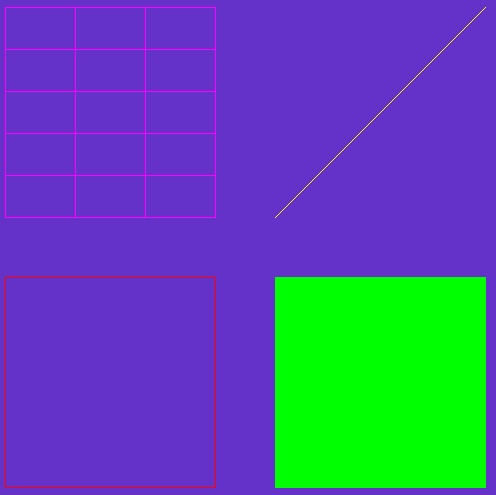
Tutorial 3: Drawing
The code of the tutorial 3 shows how to draw rectangles, circles, lines, etc.
const int DIMW = 500;
struct Data
{
int n;
Image im;
};
void init(Data& d)
{
d.n = 10;
d.im =
image(
"data/grapic.jpg");
}
void draw(Data& d)
{
line( DIMW/2+30, DIMW/2+30, DIMW-10, DIMW-10);
grid( 10, DIMW-10, DIMW/2-30, DIMW/2+30, 3, 5);
int p[5][2] = { {100,100}, {120,100}, {140,130}, {130,150}, {120, 170} };
int p2[5][2] = { {150,150}, {170,150}, {190,180}, {180,200}, {170, 220} };
}
int main(int , char** )
{
Data dat;
bool stop=false;
init(dat);
while( !stop )
{
draw(dat);
}
return 0;
}
void ellipse(int xc, int yc, int horizontal, int vertical)
Draw an ellipse at (xc, yc), horizontal radius and vertical radius, rotation optional (Thanks to Anas...
void triangle(int x1, int y1, int x2, int y2, int x3, int y3)
Draw a triangle from the vertices (x1, y1), (x2, y2) and (x3, y3). (Code provided by Bastien DOIGNIES...
void ellipseFill(int xc, int yc, int horizontal, int vertical)
Draw a filled ellipse at (xc, yc), horizontal radius and vertical radius, rotation optional (a bit lo...
void image_draw(Image &im, int x, int y, int w=-1, int h=-1)
Draw the image at position (x,y) with width=w and height=h (if w<0 or h<0 the original size of the im...
Definition: Grapic.h:613
void circleFill(int xc, int yc, int radius)
Draw a filled circle from (xmin,ymin) to (xmax,ymax)
void circle(int xc, int yc, int radius)
Draw a circle from (xmin,ymin) to (xmax,ymax)
void triangleFill(int x1, int y1, int x2, int y2, int x3, int y3)
Draw a filled triangle from the vertices (x1, y1), (x2, y2), (x3, y3)
void polygon(int p[][2], unsigned int number)
Draw a polygon. (Code provided by Bastien DOIGNIES, many thanks)
void grid(int xmin, int ymin, int xmax, int ymax, int nx, int ny)
Draw a grid from (xmin,ymin) to (xmax,ymax) with nx columns and ny rows.
void line(int x1, int y1, int x2, int y2)
Draw a line from (x1,y1) to (x2,y2)
Definition: Grapic.h:393
void polygonFill(int p[][2], unsigned int number)
Draw a simple(no edge-crossing) and without holes filled polygon.
Tutorial 4: Keyboard
The code of the tutorial 4 shows how to manage the keyboard.
#include <iostream>
using namespace std;
const int DIMW = 500;
struct Data
{
int n;
};
void init(Data& d)
{
d.n = 10;
}
void draw(Data& d)
{
int i;
for(i=1;i<=d.n;i++)
{
color(20*i, 255-20*i, 28);
rectangle( DIMW/2 - 10*i, DIMW/2 - 10*i, DIMW/2 + 10*i, DIMW/2 + 10*i);
}
}
int main(int , char** )
{
Data dat;
bool stop=false;
init(dat);
while( !stop )
{
draw(dat);
}
return 0;
}
void setKeyRepeatMode(bool repeat)
(de)Activate the repeat mode: when the user presses continuously on the key touch is repeated....
Definition: Grapic.h:462
int isKeyPressed(int key)
return the number of time the key 'key' has been pressed since the last call to this function.
Definition: Grapic.h:453
Tutorial 5: Mouse
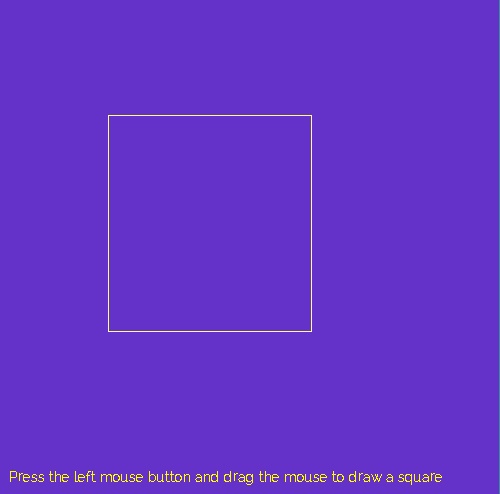
The code of the tutorial 5 shows how manage the mouse to draw a square
const int DIMW = 500;
struct Data
{
int x1,y1;
int x2,y2;
int etat;
};
void init(Data& d)
{
d.etat = 0;
}
void draw(Data& d)
{
print( 10, 10,
"Press the left mouse button and drag the mouse to draw a square");
if (d.etat)
{
}
int x,y;
{
if (d.etat!=1)
{
d.etat = 1;
d.x1 = x;
d.y1 = y;
}
else
{
d.x2 = x;
d.y2 = y;
}
}
else
{
if (d.etat==1) d.etat=2;
}
print( 10, 480,
"mouseXYGlobal=");
}
int main(int , char** )
{
Data dat;
bool stop=false;
init(dat);
while( !stop )
{
draw(dat);
}
return 0;
}
void mousePosGlobal(int &x, int &y)
After this function (x,y) store the mouse position.
bool isMousePressed(int button)
return true if the mouse button 'button' is pressed
Definition: Grapic.h:486
void mousePos(int &x, int &y)
After this function (x,y) store the mouse position.
Tutorial 6: Menu
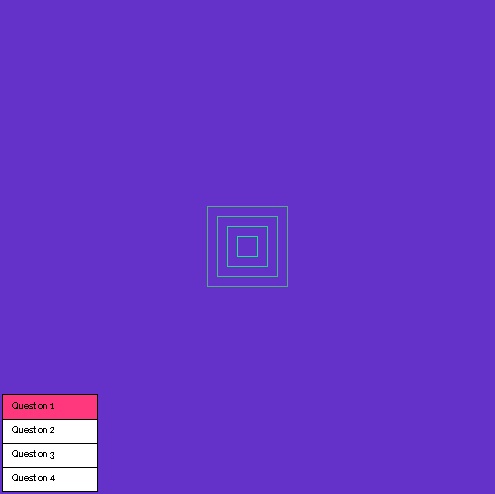
The code of the tutorial 6 shows how to create a simple menu.
const int DIMW = 500;
struct Data
{
int n;
};
void init(Data& d)
{
d.n = 10;
}
void draw(Data& d)
{
int i;
for(i=0;i<d.n;i++)
{
color(20*i, 255-20*i, 128);
rectangle( DIMW/2 - 10*i, DIMW/2 - 10*i, DIMW/2 + 10*i, DIMW/2 + 10*i);
}
}
int main(int , char** )
{
Data dat;
Menu m;
bool stop=false;
init(dat);
while( !stop )
{
{
case 0:
std::cout << "Selecting 0-th item" << std::endl;
break;
case 1:
std::cout << "Selecting 1-th item" << std::endl;
break;
case 2:
std::cout << "Selecting 2-th item" << std::endl;
break;
case 3:
std::cout << "Selecting 3-th item" << std::endl;
break;
default:
break;
}
{
case 0 : dat.n = 5; draw(dat); break;
case 1 : dat.n = 15; draw(dat); break;
case 2 : dat.n = 10; draw(dat); break;
case 3 : dat.n = 20; draw(dat); break;
default: dat.n=0; draw(dat); break;
}
}
return 0;
}
void menu_add(Menu &m, const std::string &str)
Add a line to the menu m with the text str.
Definition: Grapic.h:694
void menu_draw(Menu &m, int xmin=5, int ymin=5, int xmax=-1, int ymax=-1)
Draw the menu on the screen. See menu_add for an example of usage.
Definition: Grapic.h:721
int menu_select(const Menu &m)
return the line selected in the menu. See menu_add for an example of usage.
Definition: Grapic.h:727
int menu_has_changed(Menu &m)
Check if the menu item was changed.
Definition: Grapic.h:710
Tutorial 7: Animation

The code of the tutorial 2 shows how to display a simple animation depending on the elapsed time.
const int DIMW = 500;
struct Data
{
int x,y;
float angle;
Image im;
};
void update(Data& d)
{
const float vitesse = 20.f;
d.angle = vitesse * temps;
d.x = temps * cos(d.angle);
d.y = temps * sin(d.angle);
}
void init(Data& d)
{
update(d);
d.im =
image(
"data/mines/mine.png");
}
void draw(Data& d)
{
}
int main(int , char** )
{
Data dat;
bool stop=false;
init(dat);
while( !stop )
{
draw(dat);
update(dat);
}
return 0;
}
float elapsedTime()
return the time elapsed since the beginning of the process in second
Definition: Grapic.h:440
Tutorial 8: Plot/Graph

The plot code illustrates the drawing of a graph entering values of a function
#include <iostream>
#include <cmath>
using namespace std;
const int WIN_DIM_X = 600;
const int WIN_DIM_Y = 500;
int main(int , char** )
{
bool stop=false;
winInit(
"Demo", WIN_DIM_X, WIN_DIM_Y);
Plot p1, p2;
float x,y,y2;
x = 0.f;
while( !stop )
{
y = cos(x);
y2 = 0.5*sin(x);
plot_draw( p1, 20, 20, WIN_DIM_X-20, WIN_DIM_Y/2-20 );
plot_draw( p2, 20, WIN_DIM_Y/2+20, WIN_DIM_X-20, WIN_DIM_Y-20,
false );
}
return 0;
}
void plot_setSize(Plot &p, const int n)
Define the size of the stored value of the funtion (<0 means infinity)
Definition: Grapic.h:754
void plot_draw(const Plot &p, int xmin, int ymin, int xmax, int ymax, bool clearOrNot=true)
Draw the curve in the rectangle (xmin,ymin,xmax,ymax); clear the rectangle if clearOrNot is true.
Definition: Grapic.h:766
void plot_add(Plot &p, float x, float y, int curve_n=0)
Add a point (x,y=f(x)) to the curve number curve_n.
Definition: Grapic.h:760
Tutorial 9: Image
The demo code illustrates image functionalities of Grapic
#include <iostream>
#include <cmath>
using namespace std;
const int WIN_DIM_X = 600;
const int WIN_DIM_Y = 500;
void fillImage(Image& im)
{
int i,j;
im =
image(WIN_DIM_X,WIN_DIM_Y);
for(i=0; i<WIN_DIM_X; i++)
{
for(j=0; j<WIN_DIM_Y; j++)
{
if ( (i/10) %3 ==0)
else if ( (i/10) %3 ==1)
else
}
}
}
void draw(Image im)
{
image_draw(im, 20, 20, WIN_DIM_X-40, WIN_DIM_Y-40);
print(WIN_DIM_X/2 -150, 0,
"Image is filled by image_set");
}
int main(int , char** )
{
bool stop=false;
winInit(
"Demo", WIN_DIM_X, WIN_DIM_Y);
Image im;
Image im2;
im = im2;
fillImage(im);
while( !stop )
{
draw(im);
}
return 0;
}
void image_savePNG(const Image &im, const char *filename)
Save the image into the file: format is PNG.
Definition: Grapic.h:606
void image_printInfo(const Image &im)
Print the informations of the image im.
Definition: Grapic.h:667
void image_set(Image &im, int x, int y, unsigned char r, unsigned char g, unsigned b, unsigned char a)
Set the pixel (x,y) of the image im with the color c.
Tutorial 10: Demo

The demo code illustrates many functionalities of Grapic
#include <iostream>
#include <cmath>
using namespace std;
const int WIN_DIM_X = 600;
const int WIN_DIM_Y = 500;
struct Data
{
int n;
int demo;
int x,y;
Image im;
Image im2;
};
void demo0()
{
int i,j;
const int l = 50;
for(i=0;i<10;++i)
for(j=0;j<10;++j)
{
color( 255*i*10/100, 255*j*10/100, 0);
}
}
void demo1()
{
int x,y;
if ((x>310) && (y>400) && (x<450) && (y<550))
{
}
else
{
print( 310, 400,
"Petit");
}
}
void demo2()
{
int i,n =
static_cast<int>(10 + 10 * cos(5.f*
elapsedTime()));
for (i = 0; i < n; ++i)
{
color( 10 * i, 220 - 10 * i, 150 );
rectangle(150+5 * i, 150+5 * i, 400 - 5 * i, 400 - 5 * i);
}
}
void demo3()
{
float angle;
float rayon = 100;
int i,n = 20;
for (i = 0; i < n; ++i)
{
color( 10 * i, 10 * i, 50 );
angle = 2.f * M_PI*i/ n;
rectangle( 250+rayon * cos(angle)-10, 250+rayon * sin(angle)-10, 250+rayon * cos(angle)+10, 250+rayon * sin(angle)+10 );
}
}
void demo4()
{
int i;
int n=250;
for(i=0;i<n;i++)
{
}
}
void demo5(Data& d)
{
grid(0, 0, 500, 500, 8, 8);
int x, y;
{
int x, y;
if ((x>250) && (y<250))
}
}
void demo6(Data& d)
{
int i,j;
for(i=0;i<10;i++)
for(j=0;j<10;j++)
{
if ( (i+j)%2==0)
image_draw( d.im, i*50, j*50, 50, 50);
}
}
void demo7()
{
int i;
float a,b;
for(i=0;i<12;++i)
{
a = -(-0.5f*M_PI + 2.f*M_PI*float(i+1)/12);
print( 250+100*cos(a), 250+100*sin(a), i+1);
line(250,250,250+80*cos(b), 250+80*sin(b));
}
}
{
return (d.n-c) * WIN_DIM_Y/d.n;
}
void menu(Data& d)
{
{
int x, y;
if (x>WIN_DIM_X-100)
{
d.demo = d.n -1-y / (WIN_DIM_Y/d.n);
}
}
grid(WIN_DIM_X-100,0,WIN_DIM_X-1,WIN_DIM_Y, 1, d.n);
int i;
for(i=0;i<d.n;++i)
{
}
}
void init(Data& d)
{
d.n = 8;
d.demo = 4;
d.x = 250;
d.y = 250;
d.im =
image(
"data/pacman/pacman.png",
true, 255, 255, 255, 255);
d.im =
image(
"../data/pacman/pacman.png",
true, 255,255,255,255 );
d.im2 =
image(
"data/pacman/fantome.png",
true, 255, 255, 255, 255);
d.im =
image(
"../data/pacman/fantome.png",
true, 255,255,255,255 );
}
void draw(Data& d)
{
menu(d);
switch(d.demo)
{
case 0: demo0(); break;
case 1: demo1(); break;
case 2: demo2(); break;
case 3: demo3(); break;
case 4: demo4(); break;
case 5: demo5(d); break;
case 6: demo6(d); break;
case 7: demo7(); break;
}
}
int main(int , char** )
{
Data dat;
bool stop=false;
winInit(
"Demo", WIN_DIM_X, WIN_DIM_Y);
init(dat);
while( !stop )
{
draw(dat);
}
return 0;
}
int caseToPixel(const Menu &m, int c, int ymin, int ymax)
return the pixel from a line of the menu
Definition: Grapic.h:739
bool image_isInit(const Image &im)
return true if the image is initialized
Definition: Grapic.h:660
Examples
Grapic comes with several small examples. It can be used as source of inspiration.
Tetris

A example of tetris
#include <cmath>
#include <iostream>
using namespace std;
const int SIZE_X = 8;
const int SIZE_Y = 16;
const int SIZE_SPRITE_X = 32;
const int SIZE_SPRITE_Y = 32;
const int SIZE_BLOCK = 3;
struct Data
{
int level[SIZE_X][SIZE_Y];
int block[SIZE_BLOCK][SIZE_BLOCK];
int pos_x, pos_y;
float temps;
float speed;
int lost;
};
void createBlock(Data& d)
{
int i,j,lg,dir,k;
for(i=0;i<SIZE_BLOCK ;++i)
for(j=0;j<SIZE_BLOCK ;++j)
{
d.block[i][j] = 0;
}
for(k=0;k<lg;k++)
{
d.block[i][j] = 1;
switch(dir)
{
case 0: if (i<2) ++i; break;
case 1: if (i>0) --i; break;
case 2: if (j<2) ++j; break;
case 3: if (j>0) --j; break;
}
}
d.pos_x = SIZE_X/2;
d.pos_y = SIZE_Y-3;
d.speed = 0.f;
}
void rotateBlockLeft(Data& d)
{
int i,j;
int t[SIZE_BLOCK ][SIZE_BLOCK ];
for(i=0;i<SIZE_BLOCK ;++i)
for(j=0;j<SIZE_BLOCK ;++j)
t[i][j] = d.block[i][j];
for(i=0;i<SIZE_BLOCK ;++i)
for(j=0;j<SIZE_BLOCK ;++j)
d.block[SIZE_BLOCK -1-j][i] = t[i][j];
}
void draw_rect(int i, int j, int c=1)
{
color(c*100, 255-c*20, 10*c);
rectangleFill( i*SIZE_SPRITE_X+2, j*SIZE_SPRITE_Y+2, (i+1)*SIZE_SPRITE_X-2, (j+1)*SIZE_SPRITE_Y-2);
}
void drawLevel(Data& d)
{
int i,j;
for(i=0;i<SIZE_X;++i)
for(j=0;j<SIZE_Y;++j)
{
if (d.level[i][j]) draw_rect(i,j,1);
}
}
void drawBlocks(Data& d)
{
int i,j;
for(i=0;i<SIZE_BLOCK ;++i)
for(j=0;j<SIZE_BLOCK ;++j)
{
if (d.block[i][j])
draw_rect(i+d.pos_x,j+d.pos_y,1);
}
}
bool blocksValid(Data& d, int pos_x, int pos_y)
{
int i,j;
for(i=0;i<SIZE_BLOCK;++i)
for(j=0;j<SIZE_BLOCK;++j)
{
if (d.block[i][j])
{
if ((i+pos_x<0) || (i+pos_x>=SIZE_X)) return false;
if ((j+pos_y<0) || (j+pos_y>=SIZE_Y)) return false;
if (d.level[i+pos_x][j+pos_y])
return false;
}
}
return true;
}
bool blocksTransfer(Data& d)
{
int i,j;
for(i=0;i<SIZE_BLOCK ;++i)
for(j=0;j<SIZE_BLOCK ;++j)
{
if (d.block[i][j])
{
d.level[i+d.pos_x][j+d.pos_y] = 1;
}
}
return true;
}
bool checkLine(Data& d, int l)
{
int i;
for(i=0;i<SIZE_X;++i)
if (!d.level[i][l]) return false;
return true;
}
void suppressLine(Data& d,
int line)
{
cout<<
"suppress "<<
line<<endl;
int x,l;
for(l=
line+1;l<SIZE_Y;++l)
for(x=0;x<SIZE_X;++x)
d.level[x][l-1] = d.level[x][l];
}
void checkLines(Data& d)
{
int l;
for(l=0;l<SIZE_Y;++l)
if (checkLine(d,l))
{
suppressLine(d,l);
l--;
}
}
void init(Data& d)
{
int i,j;
for(i=0;i<SIZE_X;++i)
for(j=0;j<SIZE_Y;++j)
{
d.level[i][j] = 0;
}
createBlock(d);
d.lost = false;
checkLines(d);
}
void draw(Data& d)
{
if (d.lost)
{
print(10, 100,
"YOU HAVE LOST");
print(10, 50,
"press 'r' to retry");
return ;
}
{
if (blocksValid(d,d.pos_x-1,d.pos_y)) d.pos_x--;
d.speed = 500;
}
{
rotateBlockLeft(d);
d.speed = 500;
}
{
if (blocksValid(d,d.pos_x+1,d.pos_y)) d.pos_x++;
d.speed = 500;
}
{
bool cont = true;
while(cont)
{
if (blocksValid(d,d.pos_x,d.pos_y-1)) d.pos_y--;
else
{
if (d.pos_y==SIZE_Y-2)
{
d.lost = true;
return;
}
blocksTransfer(d);
checkLines(d);
createBlock(d);
cont = false;
}
}
d.speed = 1000;
}
if (t-d.temps>d.speed)
{
if (blocksValid(d,d.pos_x,d.pos_y-1)) d.pos_y--;
else
{
if (d.pos_y==SIZE_Y-2)
{
d.lost = true;
return;
}
blocksTransfer(d);
checkLines(d);
createBlock(d);
}
d.temps = t;
}
grid( 0,0,SIZE_X * SIZE_SPRITE_X-1, SIZE_Y * SIZE_SPRITE_Y-1, SIZE_X, SIZE_Y);
drawLevel(d);
drawBlocks(d);
d.speed = 1;
}
int main(int , char** )
{
Data dat;
winInit(
"Tetris", SIZE_X*SIZE_SPRITE_X, SIZE_Y*SIZE_SPRITE_Y);
init(dat);
{
draw(dat);
}
return 0;
}
int irand(int rmin=0, int rmax=100)
return a random number (integer) between rmin to rmax included
Definition: Grapic.h:425
bool winHasFinished()
return true if the application should be closed (because of 'ESC' or 'q' key pressed for instance)
Definition: Grapic.h:269
Pacman
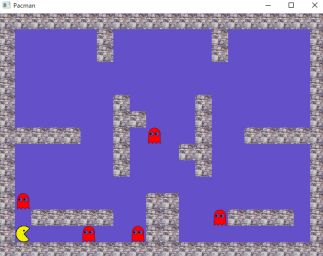
Pacman
#include <cmath>
#include <cassert>
#include <time.h>
#include "Jeu.h"
const int TAILLE_SPRITE=32;
struct sdlJeu
{
Jeu jeu;
Image surface_pacman;
Image surface_mur;
Image surface_fantome;
};
void init(sdlJeu& sj)
{
sj.surface_pacman =
image(
"data/pacman/pacman.png");
sj.surface_mur =
image(
"data/pacman/mur.png");
sj.surface_fantome =
image(
"data/pacman/fantome.png");
}
void draw(sdlJeu& sj)
{
int x,y,i_fant;
const Jeu *pJeu = &(sj.jeu);
const Terrain *pTer = jeuGetConstTerrainPtr(pJeu);
const Pacman *pPac = jeuGetConstPacmanPtr(pJeu);
for (x=0; x<getDimX(pTer); ++x)
for (y=0; y<getDimY(pTer); ++y)
if (terGetXY(pTer,x,y)=='#')
image_draw( sj.surface_mur, x*TAILLE_SPRITE, y*TAILLE_SPRITE);
for (i_fant=0; i_fant<pJeu->nb_fantomes; i_fant++)
image_draw( sj.surface_fantome, (pJeu->tab_fantomes[i_fant].x)*TAILLE_SPRITE, (pJeu->tab_fantomes[i_fant].y)*TAILLE_SPRITE);
image_draw( sj.surface_pacman, pacGetX(pPac)*TAILLE_SPRITE, pacGetY(pPac)*TAILLE_SPRITE );
}
int main(int , char** )
{
sdlJeu sj;
bool rafraichissement;
float horloge_courante, horloge_precedente;
float intervalle_horloge = 0.1f;
jeuInit( &sj.jeu );
int dimx = getDimX( jeuGetConstTerrainPtr(&sj.jeu) );
int dimy = getDimY( jeuGetConstTerrainPtr(&sj.jeu) );
dimx = dimx * TAILLE_SPRITE;
dimy = dimy * TAILLE_SPRITE;
init(sj);
horloge_precedente = horloge_courante = 0.f;
{
rafraichissement = false;
horloge_courante = (float)clock()/(float)CLOCKS_PER_SEC;
if (horloge_courante-horloge_precedente>=intervalle_horloge)
{
jeuEvolue(&(sj.jeu));
rafraichissement = true;
horloge_precedente = horloge_courante;
{
jeuActionClavier( &(sj.jeu), 'b');
rafraichissement = true;
}
{
jeuActionClavier( &(sj.jeu), 'g');
rafraichissement = true;
}
{
jeuActionClavier( &(sj.jeu), 'h');
rafraichissement = true;
}
{
jeuActionClavier( &(sj.jeu), 'd');
rafraichissement = true;
}
}
if (rafraichissement)
{
draw(sj);
}
}
return 0;
}
Questions and problems
You can check and ask your question in the issues section of GitHub : https://github.com/ucacaxm/grapic/issues
- int main() ==> int main(int , char **)
- Image im = image("data\papillon.jpg") ==> Image im = image("data//papillon.jpg") or Image im = image("data\\papillon.jpg")
- Even tutorials do not compile
- check in directory 'extern' that you have the version for your computer: mingw for windows, macox for mac and nothing for linux since you have to install them with the apt explained in the Section installtion
- Try to rerun premake with premake.bat on windows or make premake on linux/macos