AdveneUserGuide
If you have a local copy of this file, you can find the original document (that may be more up to date) on the Github repository.
Warning This user guide is far from being complete. This is a wiki, you are welcome to edit the text, and add your own corrections or precisions. This guide will be included as help file in future Advene releases.
- Warning
- What is Advene?
- A tour of the interface
- Creating a package
- Saving a package
- Visualizing annotations
- Braille support
- TALES syntax
- Dynamic views
- Static views
- Schema definition
- Package elements edition
The cross-platform Advene application allows users to easily create comments and analyses of video documents, through the definition of time-aligned annotations and their mobilisation into automatically-generated or user-written comment views (HTML documents, etc). Annotations can also be used to modify the rendition of the audiovisual document on the fly, thus providing virtual montage, captioning, navigation... capabilities. Users can exchange their comments/analyses in the form of Advene packages, independently from the video itself.
The Advene (Annotate Digital Videos, Exchange on the NEt) project is aimed towards communities exchanging discourses (analysis, studies) about audiovisual documents (e.g. movies). This requires that audiovisual content and hypertext facilities be integrated, thanks to annotations providing explicit structures on audiovisual streams, upon which hypervideo documents can be engineered.
Let us have a look at the MainInterface.
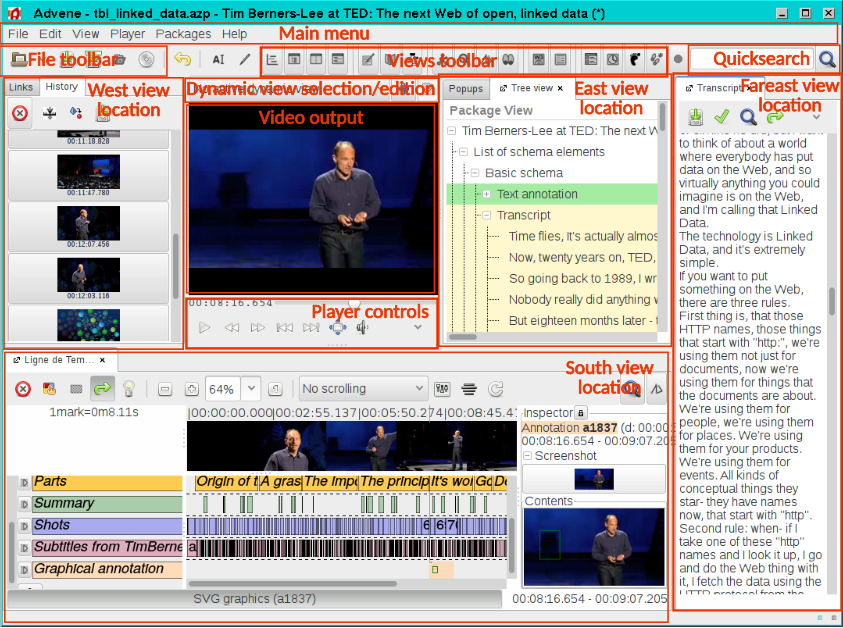
The interface is a flexible space where you can open various views, depending on your activity. The only fixed view is the video output. You can drag and drop view icons from the top toolbar into the desired location of the interface (at the left, right or below the video, as well as on the right side of the interface). Click on name descriptions in the image below to access the corresponding documentation.
(The clickable version of this image is available on an external website, Github wiki has some constraints that do not allow to put this kind of file directly).
Once an appropriate set of views is defined, it can be saved as a
workspace, either as the default one (that will be loaded upon Advene
startup), or as a named view saved into the package. Workspaces can
then be exchanged along with annotation data.
When the application is launched, a template package is loaded. It contains one schema “Simple text”, which defines one annotation type “Textual annotation” and one relation type “Elementary relation”. It is thus possible to immediately annotate a video with this simple initial schema. Other annotation types can be created at any time, to reflect the analysis carried out by the user.
The choice of the source video is done through the application GUI. It is possible to select either a video file, a DVD or a video stream, through the File/Select a... menuitems or the corresponding icons.
- Video files: any format supported by the GStreamer framework, with its various plugins.
- DVD: you can specify the desired chapter/title to start with. Be careful with DVDs: they were not made for frequent seeking, we already crashed some DVD readers. It is advised to rather rip the DVD to a video file.
- Video streams: you can enter either the URL of a video stream, or the URL of a youtube/googlevideo/dailymotion page from which the video stream URL will be extracted. Due to frequently changing code from video hosting providers, video fetching may not be reliable.
Once the video source is selected, it is possible to navigate in the movie with the navigation buttons (play, pause, fast forward and rewind), with the slider or using the navigation shortcuts. Playback speed can be adjusted, without changing the pitch of the audio, with the control below the video window.
Using the NoteTaking View you can define timestamp marks inside a textual transcription of the contents of the video (existing or created on the fly), in order to generate annotations from the timestamped text. It can also be used to take notes on-the-fly while watching the movie. Timestamp marks can be automatically inserted.
The Timeline View also offers annotation creation facilities.
Advene can integrate video processors that are able to generate annotation from the video, through the "File/Process video..." menu. Currently available filters include:
- scenechange for detecting shots.
- audio segmentation to annotate non-silent fragments.
- sound enveloppe to generate a (crude) waveform.
- barcode (qr-code)
- feature detection such as hand/face presence - if the appropriate libs (opencv) are installed
The Advene framework makes it easy to integrate many types of data - it defines APIs for import and export filters that take care of the integration and video access part. If you have a working feature extraction application/algorithm, do not hesitate to contact us to see how to integrate it.
The import module can generate a package of annotations (and often also schemas) from another file format. The formats supported at the moment (version 3.11) are:
-
Elementary text (.txt files). The text importer handles input files with 1 annotation per line. Each line consists in whitespace-separated data items (whitespace can be any number of actual space or tab characters). The format of each line is either
begin_time end_time annotation_dataor
begin_time annotation_dataThe "timestamp" setting specifies which format must be used. If set to "auto" (automatic detection), it will try to detect the appropriate format but can be mislead if annotation data looks like a timestamp. In doubt, specify your format.
begin_time and end_time can be formatted in various ways: plain integers (2134, 134...) are considered as milliseconds, float numbers (2.134 or .134 or 2.) are considered as seconds. Formatted timestamps with colons can also be used: m:s, m:s.ms, h:m:s, h:m:s.ms
-
WebAnnotation in JSON-LD format
-
the subtitle format SRT (.srt files).
-
format Xi (xml files)
-
the ELAN format (.eaf files).
-
the PRAAT format
-
the CMML format
-
the Anvil format
-
MPEG7 (FreeText annotations only)
-
Final Cut Pro XML format
-
Shotdetect (from the Lignes de temps project)
-
IRI (from the Lignes de temps project)
-
TurTLe (RDF serialisation format)
-
Transcriber
You can import external data through the menu “File/Import file” or automate import using the advene_import script.
There are two storage formats for packages: a native XML format, and a OpenDocument-like format, that stores the package data (in XML format) and associated resources (resources such as CSS files, images...) in a Zip file. The format is indicated by the filename extension: .xml for XML format, .azp for Advene Zip Package.
Data can also be exported in various formats:
- SRT
- WebAnnotation
- SMIL
- SVG timeline
- Spreadsheet (tab separated values)
- HTML+CSS timeline
- MPEG7 (experimental)
- IRI
- RDF
Thanks to the template system integrated into Advene, it is easy to export data to XML-based formats, and possible to do so with other kinds of format.
After having created some annotations, it's possible to visualize them through the graphical interface or the web server. One of the aims of the Advene project is to provide multiple views over annotated video streams.
Three types of views are available: ad-hoc views, static views and dynamic views.
Adhoc views are GUI views, implemented in the Advene prototype. Some of them can be parameterized by the user.
- Timeline View : a classical representation as a timeline.
- Package Finder : a OSX-finder-like representation of the package data.
- Transcription View : dynamic transcription linked with the video stream.
- TALES Browser View : a column browser to explore the structure of TALES expressions.
Some components have the same behavior as adhoc-views (they can be embedded, sometimes saved...) but do not hold a view of the annotation structure, they rather use an intermediary data structure - that you can see as draft data intended to become annotations after transformation/validation.
- NoteTaking View : the note taking view (see FIXME)
- EditAccumulator : a place to centralize annotation and relation edit windows
- ActiveBookmarks : this view allows to memorize timestamps and navigate through them
- Tag bag : allows to set tags (by drag and drop) on elements
- Montage : define a dynamic montage of annotations
- Video player : Additional video player, synchronized with the main video player (see screencast)
An integrated web server, based on the views defined in the Advene model, gives access to the content of the package by the means of a simple web browser. The webserver URL is http://localhost:1234/packages/advene/.
You can open the appropriate URL by using the “Views/Start web browser” menuitem, or through the W3 icon.
Default views are provided in the package template to allow to browse the package contents. You can see how they are defined (to imitate them) by using the tree view or the package finder, under the “Views/Admin view” item.
You can also define your own templates, to define renderings of the annotations. A primitive editor has been implemented, which also allows you to edit HTML source code.
To quickly define a static view (also named “comment view”) rendering the annotations for a given annotation type, you can right-click on the annotation type (in the timeline or in the tree view for instance) and select “Create a comment view”. A new static view will be generated, with template code displaying all annotations for the type, with their screenshot.
You can then either right-click on the “Rendering type Foo as table” to modify the template (to display annotations as list or transcription), or you can use the “<>” icon to edit the source HTML code and define your own rendition.
Advene supports Braille devices since version 0.30. It uses the brltty framework http://mielke.cc/brltty/ which is available on many platforms (esp. Linux and windows). Brltty has to be installed and setup before launching Advene. On linux, you have to install the python-brlapi component (see your distribution information for exact naming). On Windows, the python-brlapi component is shipped with the Advene installer.
The Braille plugin can output text to Braille devices, through dynamic views (action “Display a message in Braille”, in “External display control” category). It can also handle input events from the Braille device, through the “Input from the Braille table” event. This event is triggered by pressing any cursor key (the keys above or each character). If you want to find out the cursor index (i.e. the index of the pressed key), you can test the ${request/cursor} expression against the index value.
Navigation key support is provided with the Braille plugin: pressing the Up or Down key selects an annotation type, or the list of bookmarks, or the video itself. After this selection, pressing Left or Right keys will navigate video (from annotation to annotation, or from bookmark to bookmark, or using the same offset as standard control-left/right shortcut). The Insert key (named LEFTLEFT on some devices) inserts a new bookmark (that can then be used for navigation). The Delete key (named RIGHTRIGHT on some devices) plays/pauses the movie.
The TALES syntax (“TAL Expression Syntax”) is used in several components of advene :
- in the web server (URL building)
- in dynamic views (definition of the conditions and parameters of the actions)
- in static views (patterns of replacement)
- in simple queries (definition of the conditions)
It's important to understand this syntax and the Advene model, to better exploit the possibilities offered by Advene.
The root of the Advene model is the package, which is the unit of information that is stored/shared. A package will contain structured data, queries against this data and definition of visualizations. Structured data is composed of annotations. These annotations can be linked through relations. Annotations and relations belong to exactly one user-defined annotation-type (resp. relation-type). Annotation- and relation-types are grouped into schemas.
This hierarchy can be considered as a file system in which there are elements. A TALES expression will then be a path in this file system.
A particularity of Advene is that some elements can be reached by
several paths. An annotation will be in the package/annotations
"directory" and in the package/annotationTypes/simple_text/annotations
"directory" too.
The integrated web server directly interprets TALES expressions. It can be used to browse the data structure and it's content, through administrative views that are provided by the template package.
The start point of TALES expressions is the URL
http://localhost:1234/packages/advene/
What follows will be interpreted as a TALES expression, applied to the default package (the one that is active in the GUI).
So,
http://localhost:1234/packages/advene/annotationTypes/simple_text/annotations/a4
will return the annotation with the a4 identifier contained in the set
of annotations with the simple_text type.
The static views (UTBV) allow to specify various renderings for each element of the model. They consist of document templates using TAL syntax. TAL is using TALES to specify which content must be inserted into the specified location.
Base elements of the TALES expressions are :
-
here: current element -
request: parameters passed to the view through the web interface. In an expression like http://localhost:1234/packages/advene?foo=1&bar=toto,request/barwill returntoto. -
options: a set of optional elements :-
options/package_url: current package URL -
options/snapshot: access to the saved snapshots -
options/config: configuration options
-
Similar elements are available in the dynamic views, in order to specify at the same time the conditions having to be filled and the parameters of the actions to be carried out. On the other hand, more root elements are accessible, of which some are only defined on particular events:
-
package: current package -
annotation: the annotation which triggered the event -
relation: the relation which triggered the event -
activeAnnotations: the list of the actives annotations -
player: the video player -
event: the name of the event
Queries also use the TALES syntax, making it possible to specify
- the set of elements on which a filter will be applied
- conditions for taking into account an element
- the return value
For the last two parameters, an additional root element is defined. It
has the name element and takes the value of the tested element. Let us
recall that the root element here corresponds to the value of the
element to which the query is applied.
Thus, to obtain the annotations of same type preceding the annotation to which the query is applied, and to return their identifiers, we use the following syntax:
- Starting set:
here/type/annotations - Condition:
element“is before (Allen)”here - Return value:
element/id
and we apply the query to the desired annotation through a TALES expression :
package/annotations/last/query/annotations_before
By using the new .azp package format (just save an .xml package with
the .azp extension), you can add resources (any kind of file) to the
package itself. It is commonly used for stylesheets needed by the
package's static views.
You can browse and edit (add, delete) resources through the tree view,
which will display a new Resources item. You can access the resources
with TALES expressions such as
package/resources/style.css
If you want to use the resource, you can choose to either embed its content in the view, or reference it:
<!-- Embedding the resources content -->
<html>...<style type="text/css" tal:content="package/resources/style.css/content/data"></style>...

<!-- Referencing the resource -->
<html>...<link tal:attributes="href package/resources/style.css/absolute_url" type="text/css" rel="stylesheet" />
A dynamic view is a set of rules, which will be applied when playing a
video. Playing the video, with the structure of annotation, allows to
generate a certain number of events (AnnotationBegin, AnnotationEnd,
PlayerPause, etc). A rule will specify
- the triggering event
- a set of conditions to check
- a set of actions to be carried out
The syntax of the conditions uses the TALES syntax, enriched by a certain number of root elements specific to the context (the starting annotation, the event itself, etc).
The most current use is to filter the event AnnotationBegin on a
particular type of annotation, which gives following syntax:
${annotation/type} “is equal to” ${packages/annotationTypes/foobar}
It is possible to specify a default dynamic view, which will be activated when loading the package. For that, it is necessary to edit the package itself (via a right-click at the root of the tree view) and to indicate in the field “Default dynamic view” the identifier of the dynamic view.
To carry out particular actions (showing a message, starting the video player, etc), we need to specify in the dynamic view a rule reacting to the event “Activation of the view”.
It is possible to specify a default static view, which will be loaded when clicking on the button “Web Browser” in the toolbar. For that, it is necessary to edit the package itself (via the tree view) and to indicate in the field “Default static view” the identifier of the view.
The creation of a new schema is carried out from the tree view. Right-click on the package and select “Create a new schema”, then provide requested informations. You can also use the Edit/Create/Schema menuitem.
The creation of a new type of annotation is carried out from the tree view. Right-click on the schema in which you wish to create the new type and select “Create a new type of annotation”, then provide requested informations. It is also possible to use the Edit/Create/Annotation Type menuitem.
The creation of a new type of relation is carried out starting from the tree view. We need to right-click on the schema in which we wish to create the new type and to select “Create a new type of relation”, then to provide requested informations. Note that you can also create a new type when creating a relation between two annotations.
The edition of the elements of the package is possible from the various views. We initially advise to use the tree view in order to perceive the structure of informations.
Each element in the model has the following attributes :
-
URI: element URI (i.e. package URI + element identifier) -
id: element identifier (not for the package) -
Title: element title (which will be shown in the different view instead of the id) -
Author: element creator -
Date: creation date of the element -
Description: a short description of the element
Attributes URI and id aren't modifiable (they're so shown in bold).
The packages have two additional attributes, “Default dynamic view” and “Default static view”, which make it possible to specify default views to be activated during the loading of the package or activation of the Web Browser.
Types of annotations allow to specify the MIME type of the contents of their annotations (field “MIME type”), as well as an expression of generation of the representation of the annotations (field “Representation”). For the first field, values are typically:
-
text/plain: simple text -
application/x-advene-structured: a Simplistic structured form -
application/x-advene-values: a list of numeric values -
text/xml: XML
The second field (“Representation”) allows to indicate an expression to be applied to the annotation of the edited type. Its typical use is in the case of a structured type of annotation (in the Simplistic structured form, or in XML, etc), where we do not want to represent the corresponding annotations by their entire contents. We can so specify the field to be used to build the representation, via a TALES expression.
Thus, a structured annotation whith the fields title, content and
number will be able to use as a representation
here/content/parsed/title
or
string:${here/content/parsed/number}: ${here/content/parsed/title}
The simple structured form allows to create annotations easily
containing various fields. For that, we use a custom text-based
formation, with one line per field. Each line has the form
<pre>name=value</pre> Thus, a structured annotation whith
the fields title, content and number could contain
number=42
title=Surprise !
content=The hero is entering a room, finding all his friends.
The exploitation of this type of content is carried out through TALES
expressions using the method parsed applied to the content. Thus, to
reach the shot number, use the syntax here/content/parsed/number
JSON content can be parsed by Advene in order to express structured information.
The exploitation of this type of content is carried out in the TALES
expressions using the method parsed applied to the content. The above example could be represented by
{
    "number": 42,
    "title": "Surprise !",
    "content", "The hero is entering a room, finding all his friends."
}
To reach the shot number, we use the same syntax
here/content/parsed/number.
The Keyword list type indicates that the (textual) content of annotations will consist in a set of keywords, separated by commas (,). An optional comment can be added the keyword list, between parentheses, e.g.:
keyword1,keyword2,keyword3(comment)
Additional metadata associated to each keyword can be specified in the
annotation type definition. More precisely, the Completion field (in
advanced annotation-type options) holds a list of predefined keywords. It is
possible to limit the valid content to predefined keywords (see
Edit/Preferences/Text-Content/Predefined terms only). If you
activate the Quick fill option (in
Edit/Preferences/Text-Content/Quick fill), then using the keys 1 to
9 when over an annotation representation (in the timeline for
instance) will toggle (add or remove from the keyword list) the
corresponding keyword from the completion list.
The Value metadata field in advanced annotation-type options can be
used to associate additional metadata to each keyword. It consists in
a JSON-encoded dictionary, whose keys are the keywords. The values are
themselves dictionaries holding structured data about the keyword. The
following example (taken from the
AdA project) uses this feature
to ensure import/export from/to RDF with specific values.
{ "extreme long shot": {
"ontology_uri": "http://ada.filmontology.org/resource/2020/03/17/AnnotationValue/FieldSize_extreme_long_shot",
"numeric_value": 2.0
},
"long shot": {
"ontology_uri": "http://ada.filmontology.org/resource/2020/03/17/AnnotationValue/FieldSize_long_shot",
"numeric_value": 3.0
},
"medium long shot": {
"ontology_uri": "http://ada.filmontology.org/resource/2020/03/17/AnnotationValue/FieldSize_medium_long_shot",
"numeric_value": 4.0
}
}
Annotations with the Numeric values (application/x-advene-values)
mimetype will be rendered on the timeline with bargraphs representing
the values. The format is a simple textual list of values between 0
and 100, separated by spaces, such as
10 5 27 40 60
The types of relations allows to enforce the type of the annotations in
relation. That is carried out in the edition window via the field
“Members” where it is possible to insert, remove and reorder the types
of annotations.
The views are applicable on any element of the model. It is possible to
force their use to certain types of elements by specifying the fields
“Class” and “Type”. The field “Class” is by default fixed at "',
indicating the generic character of the view. If we wish to restrict his
application to a package, package should be indicated. The various
possible values are:
packageschemaannotation-typerelation-typeviewannotationrelation-
list : In this case, we can indicate the type of the elements in
the list, in the field “Type”
Each view has a MIME type, defining its contents. This field generally
contains the values text/html (HTML), image/svg+xml (SVG) or
text/plain (simple text).
The dynamic views are a particular case, using an internal type:
application/x-advene-ruleset, and applying to a package.
You can read some advice about the writing of Zope Page
Templates.
There is no Advene-specific template user guide yet. The best way to
define new templates is to have a look at existing documents.
Advene provides a tool that allows you to export the defined web-based
visualisations of annotations to static html files (File/Website export…), which can then be uploaded to any website and be used
directly from the browser, without having to install Advene.
In standard packages, the available views are mainly the integrated
administration views, that offer an overview of the package's
content. You also can create your own views using the Comment
component, which is a WYSIWYG editor allowing to insert references to
annotations or annotation types in a text, and generates a HTML
template with appropriate links. The generated html page displays the
annotation text and its thumbnail and clicking on the thumbnail starts
the web player that displays that part of the video. More advanced
visualizations can be achieved by users with technological expertise
(ability to write HTML/CSS/js), who can also create their own HTML
templates (using the TAL template language).
The integrated web player does not allow the use of superimposed text
or subtitles yet, but only the possibility of viewing the movie
starting from a certain time up to another, as defined in the
annotation.
To do this, you need to create a folder where all the files that
advene creates during the export will be inserted. Care must be taken
when exporting to insert the right video link.
If it is a video on youtube insert in Video URL:
https://www.youtube.com/watch?v=Ruf1lRNXmCQ
If, on the other hand, it is a video on its own web server, enter in Video URL:
https://www.mysite.com/myvideo.mp4
The recommended way is to use a relative path name, like myvideo.mp4
or ../movies/myvideo.mp4. In this case, the directory is relative to
the one of the exported html files. If you specify for instance
myvideo.mp4 then you can simply copy the video file in the same
directory as the exported HTML files (after export) so that it is
accessible.
At this point, click on convert and advene prepares all the necessary
files to upload to your website, including the web player.